


![]()


![]()

Before I show you how I made my Driftwood Sailboat, I want to say THANK YOU to my sweet friend Kathy from Creative Home Expressions

Do you remember my post about making this Pottery Barn knock off vase? I mentioned, in my post how I wished I had some Hydrangeas to dry out and put in my new vase. You don’t see them down here in Florida. Maybe it is too hot for them. I just love them.


![]()
Kathy e-mailed me and said she would ship me some when hers where in bloom. I received my package yesterday. She did a great job, soaking the papertowels in water and putting them in ziploc bags and shipping them. A few of the stems were drooping but I am drying them out and I am still enjoying them. Aren’t they gorgeous? She has beautiful colors. Thank you Kathy–I LOVE THEM.


![]()


![]()
Have you seen these driftwood sailboats by White Flower Farmhouse?

Aren’t they ADORABLE?
I just love them. I We went to the beach (after our anniversary dinner, a couple of weeks ago) and we walked around for awhile, looking for a large piece of driftwood, but we only found some smaller pieces.
I have the advantage of living minutes from the beach, but we don’t go on a weekly basis and they comb the beaches early in the morning so they are clean. You have to get up really early to find stuff like that. So what is a girl to do?
MAKE HER OWN DRIFTWOOD. No, I didn’t–OH YES I DID
I had a 2 x 4 in the garage (that I had picked up at one of the Big Box hardware stores in the discarded pile. I got it for 50 cents.)

Then I took the Sabre Saw and starting cutting chunks out of EVERY side and the ends.
I wanted the edges to be more rounded and chunky.

Then I picked up all the scraps I had cut off and glued them to the top, with my Gorilla Wood Glue.


![]()
I took some trim I had and broke the trim over my leg so it would be jagged. Then glued all if it down with my Gorilla Wood Glue.


![]()
Now I needed to fill it in and round it out even more.


![]()
I used some caulk and just added until I got the look I was wanting.
At this point I can see exactly where this is going and I love it BUT my kids, my parents (even my father-retired artist from Hallmark-could not see how this was going to look like driftwood. They thought I should just pitch it and erase the pictures and stop wasting my time.)


![]()
I made sure all the jagged edges were covered well. After all I have 4 kiddos and I didn’t want any injuries, plus it needed to look like driftwood and driftwood has all those rough edges that have been tumbled off while out to sea.


![]()
Paint doesn’t stick to caulk very well, so I covered it in white tissue paper.


![]()
I had a little bit of my Deco Art Texture Crackle left over and so I smeared it over the tissue paper and then put it out in the nice hot garage to dry.


![]()
Once it was dry I started painting it. First I went over it with Bleached Sand and then some Khaki


![]()
Then I added in some raw umber. I applied all of the paint with the Sponge brushes from Rockler. I tore this up. The Crackle was pretty rough on it.
Next I mixed together the slate grey, graphite and raw umber to create a color very close to a favorite color of mine but since it is made by another company, I needed to mix the color I wanted.


![]()
You have to layer in your colors and I would let the sponge drag the color across an area. I didn’t want it to all be blended.


![]()


![]()


![]()
I would go back in with a color here and there until I got the look that I wanted.


![]()


![]()


I added paint to one of the pieces of wood we found on the beach.


![]()
Once DRY-this is what I had:

Once my paint was completely dry, I drilled a hole into my wood HULL and then mixed my Gorilla epoxy glue and glued in my MAST. Don’t you love all the crackling?


![]()

I used the Epoxy because this is what the Gorilla Glue website said about the Epoxy:
Gorilla Epoxy New Gorilla Epoxy is made with gap-filling capabilities and an all purpose formula that easily bonds steel, wood, aluminum, ceramic and more. Sets in just 5 minutes and provides high impact resistance for your toughest projects.
Do you see another piece of driftwood that I found? That is what I used as my idea for creating my DRIFTWOOD and I have to say, I think I came mighty close to the real thing–if I do say so myself.


![]()
AHHHHH!!! I love it.

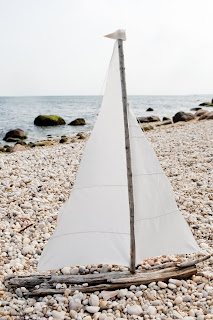
Next I grabbed some of my supply of canvas cloth, ripped it so it would have raw edges and added some hemp rope to it and hot glued it to the stick.
I think I am going to get some smaller string and tie it on to the stick, I think I will like it even more like that. I had a taupe colored cloth and added the little flag at the top in the darker color.
Next it was time for the STARboard to have a photo shoot.


![]()


![]()


![]()


![]()

![]()


![]()


![]()


![]()


![]()
I took some extra ripped canvas and wrapped it around the bottom of the stick and I love it.
What do you think?
Now I need a striped one and a few others in some adorable cloths.

![]()
I will be posting this over at the DIY Club. What projects will you post for the July Contest?
If you like my Driftwood Sailboat and want to post about it–I would love to have you do so. Let me know and I will come over, if you post about it and I will leave you a comment.

www.itssoverycheri.com

Be sure to enter our next party:

I am entering:
![]()
House of Hepworths
Somewhat Simple
Tales from Bloggervitaville
The Shabby Chic Cottage
733-A Creative Blog
Fingerprints on the Fridge
Chic on a Shoestring Decorating
Finding Fabulous
Remodelaholic
KOJO Designs
FrugalFabulousDesigns
The Brambleberry Cottage
Its A Hodge Podge Life
Domestically Speaking
tatertots and jello
Under the Table and Dreaming
Funky Junk Interiors
504 Main
I heart Nap Time
Between Naps on the Porch
For What Its Worth-or NOT
Making the World Cuter
The Girl Creative
Sumos Sweet Stuff
The DIY Showoff
Keeping it Simple
Creative 2X Mom
A Beautiful Mess
All Thingz related


{ 55 comments… read them below or add one }
WOW! Turned out fabulous. I bet it even has more weight thatn a real one which is great for stability. TFS!
Your sail boat turned out so cute! Very creative !
This is truly quite fantastic!! So realistic! The sailboat is adorable!
happy 4th
Cheri!
Your driftwood is amazing!
That sailboat is just fabulous!
Congrats for making your very own driftwood!
And thanks for popping by Bainbridge!
Happy Fourth!
xo
Thanks for asking me to stop by Cheri. Your boat is cute! I made one awhile back and love mine too. http://www.thestoriesofa2z.com/2010/04/driftwood-sailboat.html
It’s so very AWESOME! I love it.
The sail boat turned out Terrific!! I am a follower!
LOVE ITTTTT! i love all of the detail on yours! It is gorgeous!
I LOVE your boat and the gorilla glue technique. I would take one of everything at Whiteflower Farmhouse…gorgeous stuff! You did a fantastic DIY! Speaking of DIY, I’m off to see what that DIY club is all about…
Jami
Ok seriously?? You made your own driftwood?? I bow down to your extreme craftiness. 😉 I love the sailboat – what a great project.
Wow!! Your attention to detail is awesome! It turned out great!!
That is amazing! Wonder what your kids/husband/etc thinks about it now? Love it sitting on that gorgeous chair.
Thanks for linking up with Sugar & Spice.
Sorry! You linked up with What are little boys made of! LOL.
You did awesome gal ! big high fives coming your way .. love it !
Happy 4th to you & yours
hugs from Savannah, Cherry
This is soooo super cool!! I love it. FYI, I’m totally copying this! My husband is a part-time boat captain, so I kind of have too!!!! 🙂 thank you for the inspiration. I will keep you posted when I do.
Really really cool Cheri! I love it!!! I love how weathered it looks. Wow!
XOXO
Jen
I have wanted one of those boats for a while now. Unfortunately, I do not have access to driftwood. What a great project. I think I will have to try it out. Your boat looks sooooo good!
I love this, I can’t believe how much it really looks like a chunk of driftwood! Ooo a striped sail one would be awesome!
I am amazed. It looks exactly like the driftwood. I am going to read your blog from start to finish as soon as I have time.
The sailboat is really precious Cheri. Good job!
Enjoy the 4th! ~Melissa:)
are you kidding me? that turned out perfect! great job!
I love your sailboat! I’ve never seen anything like it before. My tv room is done in a beachy theme, maybe I should try to make one!
I saw the pic by pic of transforming that 2×4 to “drift wood” but I still can’t believe that! That is Martha worthy if I ever saw it! Wow…. I don’t really know what to say! I can’t believe you did that!
How adorable Cheri! Looks like the real deal to me. 🙂 Love the tone on tone aspect!
Donna
Wow. Wow. Wow. I absolutely love it!
Oh I REALLY adore this project. It is going into my style file for sure!
Happy 4th of July!
Wow, Cheri, I can’t believe you were that dedicated to making driftwood. The boat looks great.
This is so cool!!! Making your own “driftwood”…very creative.
Thanks for sharing this project.
Jane (artfully graced)
I can’t believe you made your own driftwood! It looks authentic. And I love the piping on the sails. I made a driftwood sailboat of my own a few months ago. http://holy-craft.blogspot.com/2010/05/driftwood-sailboat.html
Yours looks great!
Ha! I can’t believe you made your own piece of drift wood. Good for you!
You did an amazing job on this. I can’t believe you were able to make your own driftwood. Great job!
Great project. So creative. Annette
Wow!! I am sooo impressed with how you made this!! It really looks like driftwood!
I am constantly amazed by the ingenuity of all the ladies in blogland…you included!
Thanks so much for sharing! I have a piece of driftwood in my beach themed bathroom and may have to transform it!!
Blessings,
Becky
Hey Cheri ~
Looks awesome!! It would go perfect in my beach bathroom ;)) So cute!!
Have a wonderful evening!!
~ Michella ~
~ ~ xo ~ ~
Cheri – This is amazing! I love it! I can not believe you made the driftwood – Fantastic job!! So cute! Hope you had a wonderful Fourth! Thanks for joining the Sunday Showcase! ~ Stephanie Lynn
Whew! Glad they got to you okay ~ I hope you enjoy them! I thought you used a real piece of driftwood, Cheri. From the first picture I saw, it looked real. Your boat turned out great. What does the family say now? {“We will never doubt your genius again, Cheri!”}.
Seriously. You are amazing, Cheri. I can not believe you made your own driftwood. I can’t believe ME ever having the ambition or the creativity to even think about making my own driftwood! lol! Incredible! The color turned out just perfect. I’ve been oggling those boats at White Flower Farmhouse for a while now, and wondered how I could make one myself. Now I know! Thank you for sharing this with us. You’ve got us all running to the craft store, now, for paint supplies!
Loving your blog, girl!
xoxo laurie@heavenswalk
What a beautiful project!
We went to the lake over the weekend and I picked up some drift wood with this in mind! Thanks so much for sharing @ Anything Related!
Cheri – I want one!! I’ll be featuring this today. Stop by and grab a featured button if you like. Thanks again for joining the Sunday Showcase. Hope you have a fabulous week! ~ Stephanie Lynn
That is so very impressive! I thought your sailboat was super cute, but then… to read that you “made” the driftwood…. And it looks awesome!! Thanks for stopping by and leaving me a sweet comment. Congrats on your feature as well. Well deserved!
That is so awesome!!! It really looks real!
Wow! I can’t believe you made this – it looks like something you would pay a ton of money for in a gift shop.
Thanks for linking up to Fab Friday –
Cheers!
That looks incredible. What a great summer decoration.
Love it! Cheri! This is awesome…Great Job!
What a wonderful project! I found you through the blog hop at The Girl Creative, but have also heard a lot of great things about you from my friend Holly at 504 Main. I’m so glad I stopped by. I live just a few blocks from the ocean in an 1800s Victorian. Our downstairs bathroom is ocean themed, and as it’s an old house, it has a lot of quirks (that I adore) and funky spots that can be a challenge to decorate. This is the absolute perfect project for just such a spot! Thank you so much. Your driftwood boats are elegant, yet rustic. Excellent photos and DIY! Best, Jenn
beautiful.. a nice reminder of wind and sea and sand..
pinar
Oh, this is a wonderful project! I am looking for some things to put above my cabinets in our home in Florida! This would be perfect! Thanks for sharing! ♥
Just lovely. I wish I were this creative.
Visiting from the DIY Club, love it! I wanted to make one of these a couple months ago for my basement entertainment center but didn’t tackle it. I wouldn’t have thought of all the details you put on yours so I would have wanted to change mine now to make it better if I had made one so I’m glad I didn’t. Now, I have all the info I need to tackle it.
Wow I can’t believe you made the driftwood. It looks so realistic! The colors you chose were just perfect! Thanks for stopping by and visiting my blog! I appreciate your comments!
and this is an alltime fave! beautiful!
This turned out great! Don’t know if I would have had the patience to creat my own driftwood!
Hi Ms. Cheri,
It was so good to hear from you! I am just now getting back into the swing of things blogging wise. After 4 years of a grueling schedule I have decided to take this semester off. My house has numerous projects waiting and my family is loving having their mom totally available for them. 🙂 I will eventually go back.
I am so glad you posted this again because when I saw last weeks sailboat winner I was thinking “This was done by someone else before….who was it….” Of course it was you. My smile was turned upside down when I saw that no credit was given where credit was due. So may I say once again, well done!!!
I have always loved your sailboat and can’t believe how very creative you are. It is so realistic looking. You’re quite the artist!
xox
Nancy