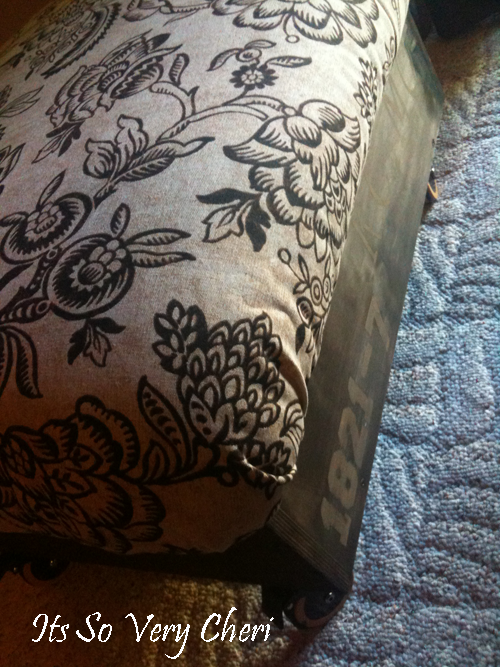
We had the opportunity to make our own ottoman through the DIY Club.
We worked with . They sent us a kit and tools.
The kits comes with written, as well as a video step-by-step instructions.
Be sure to read to the very end because I have a surprise for you.
KITS:


There were just a few things needed to complete the project that did not arrive in our box.
1) Staples for an upholstrey stapler or staple gun (which is totally understandable since everyone needs a specific size)
2} and the fabric that you want to put one your ottoman (again understandable-due to your own taste).
3} Some basic tools/equipment (like drill, tape measure…)
I did alter the project a little and mine required some additional wood but that was my decision based on what I wanted for my ottoman.
You know me- I love an eclectic look and I wanted to do mine just a little different.
I love the old utility carts and decided I wanted to make mine look similar. Of course it wouldn’t have the old metal wheels and would not be exact but this was my inspiration.

I watched the video (that was sent in the kit) all the way through and then watched it again and stopped it as I worked on it step by step.
I opened the box to an array of wood, foam, tools, and lots of extras.
They did send me a bottle of wood glue but since we have Gorilla Glue on hand and it is my favorite wood glue I grabbed the bottle and used it. I used the glue between areas before I drilled and screwed in the screws. This piece will be used by our family which includes 4 kids and I wanted it to be extra sturdy and it is. It is solid.

I made sure that my screws were pretty evenly spaced out because I was not going to cover my wood. If you are covering the wood with fabric you would not have to be accurate.
Everything came cut and ready to be put together.
Sorry some of the photos are grainy. It was super hot and so I worked inside. We don’t have great natural lighting -the result not as great of photos.
I had these awesome casters from Rockler and knew they would be PERFECT for my “utility cart ottoman”. They have a locking mechanism so we can lock them and keep it stationary or flip the locks and roll it where we want it. AWESOME!!! I also love the wood and black combo on them.
Time to stop the tape and grab the stapler and staples. Then it was time to run to buy more staples. (NOTE to self–check how many staples you have before you start.)
OK so now I can get on with the next step. Take a drink of coffee before heading outside into the brutal heat (because you won’t want it after you come in) to spray the foam adhesive. Having the casters on, made it easy to roll outside BUT I would recommend taking them off especially if you are spraying the sticky foam adhesive all over the sides. You don’t want to get it all over your casters or bun feet.
NOTE: My ottoman had gone together according to their directions up to this point but because I was doing mine a little differently I just kind of winged it (but kept watching the video). I made a frame to sit on top of the wood frame so I had something to attach my foam to because I wasn’t taking my fabric all the way to the bottom of the wood I needed a ledge to attach my fabric to. (I hope it makes sense -once you see the finished product). I applied my foam and because I wasn’t covering the sides I used the side foam and padding on the top so it is super cushy and we LOVE it.
I grabbed my trans tint dye from Rockler and brushed it on with my Rockler sponge applicators. I did not dilute the dye but it can definitely be diluted. It does not take much when it is diluted. I have used this bottle on several projects and you can see how much I still have left.
(Once again-I should have removed the casters before I did the dye. I also should have dyed the wood before I added the foam. I had to get it up under it and be super careful so it didn’t get on the part I wasn’t trimming off.)
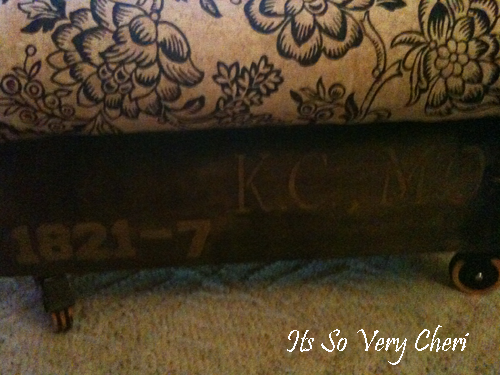
I grabbed some stencils and paint from DecoArt. I did some numbers and lettering for KC, MO.

On the other side I did the Schutte lettering that I had printed off the computer. They are a lumber company from Kansas City. It is one of the oldest businesses in Kansas City and they have some amazing options for unique wood that you won’t find at most lumber yards. Since we are from Kansas City it fit perfectly.
Now, it was time to add my fabric.

So here it is all complete. What do you think?
 I sanded all of my wood before dying it so it would be smooth on all of the edges, then I sanded over it again, after it was painted to give it a more vintage look.
I think the screws add character to this piece.
You can turn it long ways or have it sitting more wide. I LOVE IT!!!
 One of the things I loved about this project is that it opened my mind to other options and project ideas.
This was such a fun project. My son was so impressed he said “Mom, maybe you can start building all of our furniture”.
Thank you The Upholstery Studio for the opportunity to use your kits. This was such a great project. It was easy and was put together very quickly. It is a great quality piece and will be used for years to come.
You want to go over and check out the other three projects as well.
Roeshel from The DIY Show Off with her custom made fabric that she designed.
Holly from 504 Main made a romantic skirted ottoman.
Amy from Whisperwood Cottage’s fur ottoman
NOW you can head over to the DIY Club and enter to W–I–N your own kit.
I can not wait to see what you put together.
I am entering my post into these parties:
Making the World Cuter
The Girl Creative
Sumos Sweet Stuff
Crafts Keep Me Sane
Sew Can Do
Be Colorful
Ninth Street Notions
Marvelously Messy
The Southern Institute
I heart Naptime
KOJO Designs
Fingerprints on the Fridge
House of Hepworths
Somewhat Simple


{ 13 comments… read them below or add one }
that is so cool! and you and amy both made awesome ottomans!
Thanks Cassie–we LOVE it.
I just think it is so unique and want to build lots of things.
They have the cutest little couches for kids that I want to do.
Love it! The fabric is really pretty!
I could not find fabric that I wanted. That was the hardest part of the entire process. I looked and looked. I am working on designing my own piece similar to what I had in my mind all along. I am going to make it into a slip cover that we can pop over it if we want.
It’s beautiful, Cheri! I love the way you made a cushioned top and finished the wood (love the dye and wording)! The caster are the perfect touch! Great job! 😉
That looks really great. Love how soft it looks and the casters ARE the perfect touch.
This is such a cool look! It is so different than what I have seen – great!
Thanks ladies–I just love the casters on it. It gives it that eclectic look. Holly-thanks I love it just because it is so different than what you could go out and buy somewhere. I loved this project.
You really made that kit your own! Love those wheels! Super idea to do those stencils! Shhh. Don’t tell the other DIY’ers but yours really rocked!
Thanks so much. I really like the creativity of each one. I love the fact that you can MAKE IT YOUR OWN. It was such a FUN project to work on. Had I not run out of staples I could have gotten the entire project done in one day.
Great job!! I’ve got two of these on the go at the moment, a little different from yours…wish I had castors like those, they’re awesome! Well done you!
Color me blown away. I will be featuring your delightful ottoman later tonight on BeColorful.
Pam
Pam–thank you so much. Be sure to let your readers know they can enter to win a kit over at the DIY Club and you should enter too.
Cheri