


Do you see my starfish project?


![]()


![]()
Seriously, Since we started the DIY Club I have been so busy. I collapse into bed at 2 am many nights, Errr,,,ummmmm …Mornings…Ok Middle of the night, because it is pitch black out and I can hear the crazy frogs in the back yard pond talking to each other. I swear I should take a video of it and let you hear them. These frogs make the most unique noises. I am going to do it–I am going to take a video and post it on here. It is so loud, you can hear it all the way to the front of the house.
ANYhow…I had not been to Layla’s since FOREVER. I had made my Project For Any Season, and I pop over there–to Layla’s to catch up on some things (it would have taken me forever to catch up on everything) and what do I see? THIS:
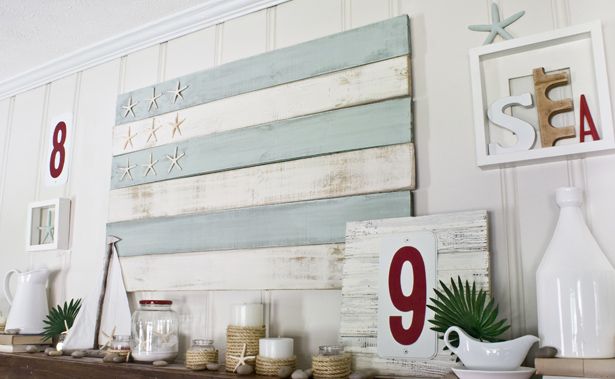
SERIOUSLY? how close are our two projects? My 6 starfish are representing the 6 of us, in our family.
Did you see her sailboat–look at the one I made–{My Sailboat HERE}


![]()
Do you want to know what is even funnier than they fact that our boards are soooo similar? I had just picked up some metal house numbers from the Restore. I wanted to get a few more before I put mine together. I also wanted to look for some letters to spell out the word BEACH and what does she have but SEA. I had to laugh. I guess I was having a Layla moment and didn’t realize it. I guess the next time she doesn’t have time to change her mantle, she can just call me.
~~~~~
So here is how I did it.
I grabbed some thin ply wood and cut it into strips (I had a few already done but needed more). I painted it with my DecoArt Americana lamp ebony black paint, then sanded and went over it with my Americana white wash.


![]()
I sanded over it and added some Americana slate grey.


![]()
I mixed it with my weathered wood. (Those other colors are dry paint.)


![]()
I went over the boards, front and back. I had used a couple of the boards to lay a project with wet paint on, before I had received myRockler Painter’s Pyramid Turntable

another great product for those painting jobs are the Painter’s Pyramids. They make the job so much easier.

I painted the bront and back of my boards.


![]()
Some more sanding with my favorite little Sanding Bug.


![]()


![]()
Depending on how heavy you apply the weathered wood, will depend on the level of weathering that you will see. Check out my Chair that I did as well .{HERE}


![]()
I had a little bit of my DecoArt TEXTURE left over and decided to finish it off with the texture in some places and I am so glad I did.


![]()
I went over it with my white wash, then added in my Sea Aqua Americana paint.


![]()
Then sanded again with my handy dandy Sanding bug and did another wash with my white wash, over the aqua board and my weathered wood boards.


![]()


![]()
I grabbed this piece of bead board from the garage and painted the edges wih my Americana Raw Umber and even added a few areas in the middle. Next I went over the middlle with Americana Terra Cotta paint. I grabbed a piece of scrap wood and painted it Americana RAW UMBER and it became my pumpkin STEM. I attached a popsickle stick to the back of the pumpkin, using my Gorilla EPOXY GLUE

Once my paint was dry I went over it with my Gorilla Wood Glue and sprinkled PK Glitz Timber and Forest Green over the “pumpkin and stem”.


![]()
So you don’t waste any glitter use a coffee filter to catch the excess and then add it back in to your bottle. Your glitter will last a long time that way.


![]()


![]()
I used another smaller board for the back and used my Gorilla Wood Glue to glue each board down to it and added a DISChanger to the back to hang it or I can have it on a mantle like Layla did.
Have I told you how much I love DISCHANGERS? They are the best thing since the Ice cream truck.

I love the versatility of this piece. I can change it with the seasons thus the name “A PROJECT FOR ANY SEASON”.
If you look CLOSELY –yeah you may have to het really close to the screen to see it, but I added 2 little hooks and wire. I like the look of it. I also added a tiny nail in the center giving me mutliple options of where I will hang things from my weathered boards.


![]()


![]()
Because of that little nail that I added to the center I was able to “catch my wire on it and hang my starfish on the left so it looked more like a flag but ……
![]()
Here it is with my Super Duper Easy to Make Pumpkin and it is hanging in the middle.


![]()
I grabbed a few more boards and I am working on an idea for Christmas. Next week I will show you that project.
What do you think I will make with those boards?
I will be posting this over at the DIY Club.
Do you want to see what else I have been working on?


![]()

www.itssoverycheri.com

Be sure to enter our next party:

I am entering:


![]()
mom 4 real
Tatertotsandjello
504 Main
The DIY Showoff
Between Naps on The Por
ch
I am only one woman
funkyjunk interiors
a little lovely blog
Fingerprints on the Fridge
DecorMamma
Tools are for women too
House of Hepworths


{ 9 comments… read them below or add one }
It is adorable!! Great work.
It’s so cute! Wow – you did a great job. 🙂
That’s too funny that your things were so similar to that shops. I love it when stuff like that happens!
Girl – I love your weathered boards! The starfish and pumpkin are cute. I love how you’re changing the look of it. Very cool idea!
Uhm – I’m thinking you’re gonna do something patriotic with the other boards??? LOL
So cute Cheri! And too funny. That happens with me a lot too with another blogger…I always see something I did or have plans to do. Great minds DIY alike. 😉
I love your starfish board, it is fab? Just one question, where did you find the starfish??
Tracey
Tracey or anyone else–
I live in Florida, right by the Gulf Coast, so there are SHELL SHOPS all over down here.
If you need some I could get them for you. I think they run $1-$5 a starfish depending on the size, quality and the shop.
Cheri
love this project!!! the colors are so me and a much beachier and eclectic version of americana!
I absolutely loved how you personalized your project with 6 starfish!
Your projects are beautiful! I’m love how clean and summery it feels (especially when we have snow and single digits are our house right now.) Amazing.